Full Observability and Zero Disruptions
See Clearly, Fix Quickly. Observe and Fix any API issues in Real Time
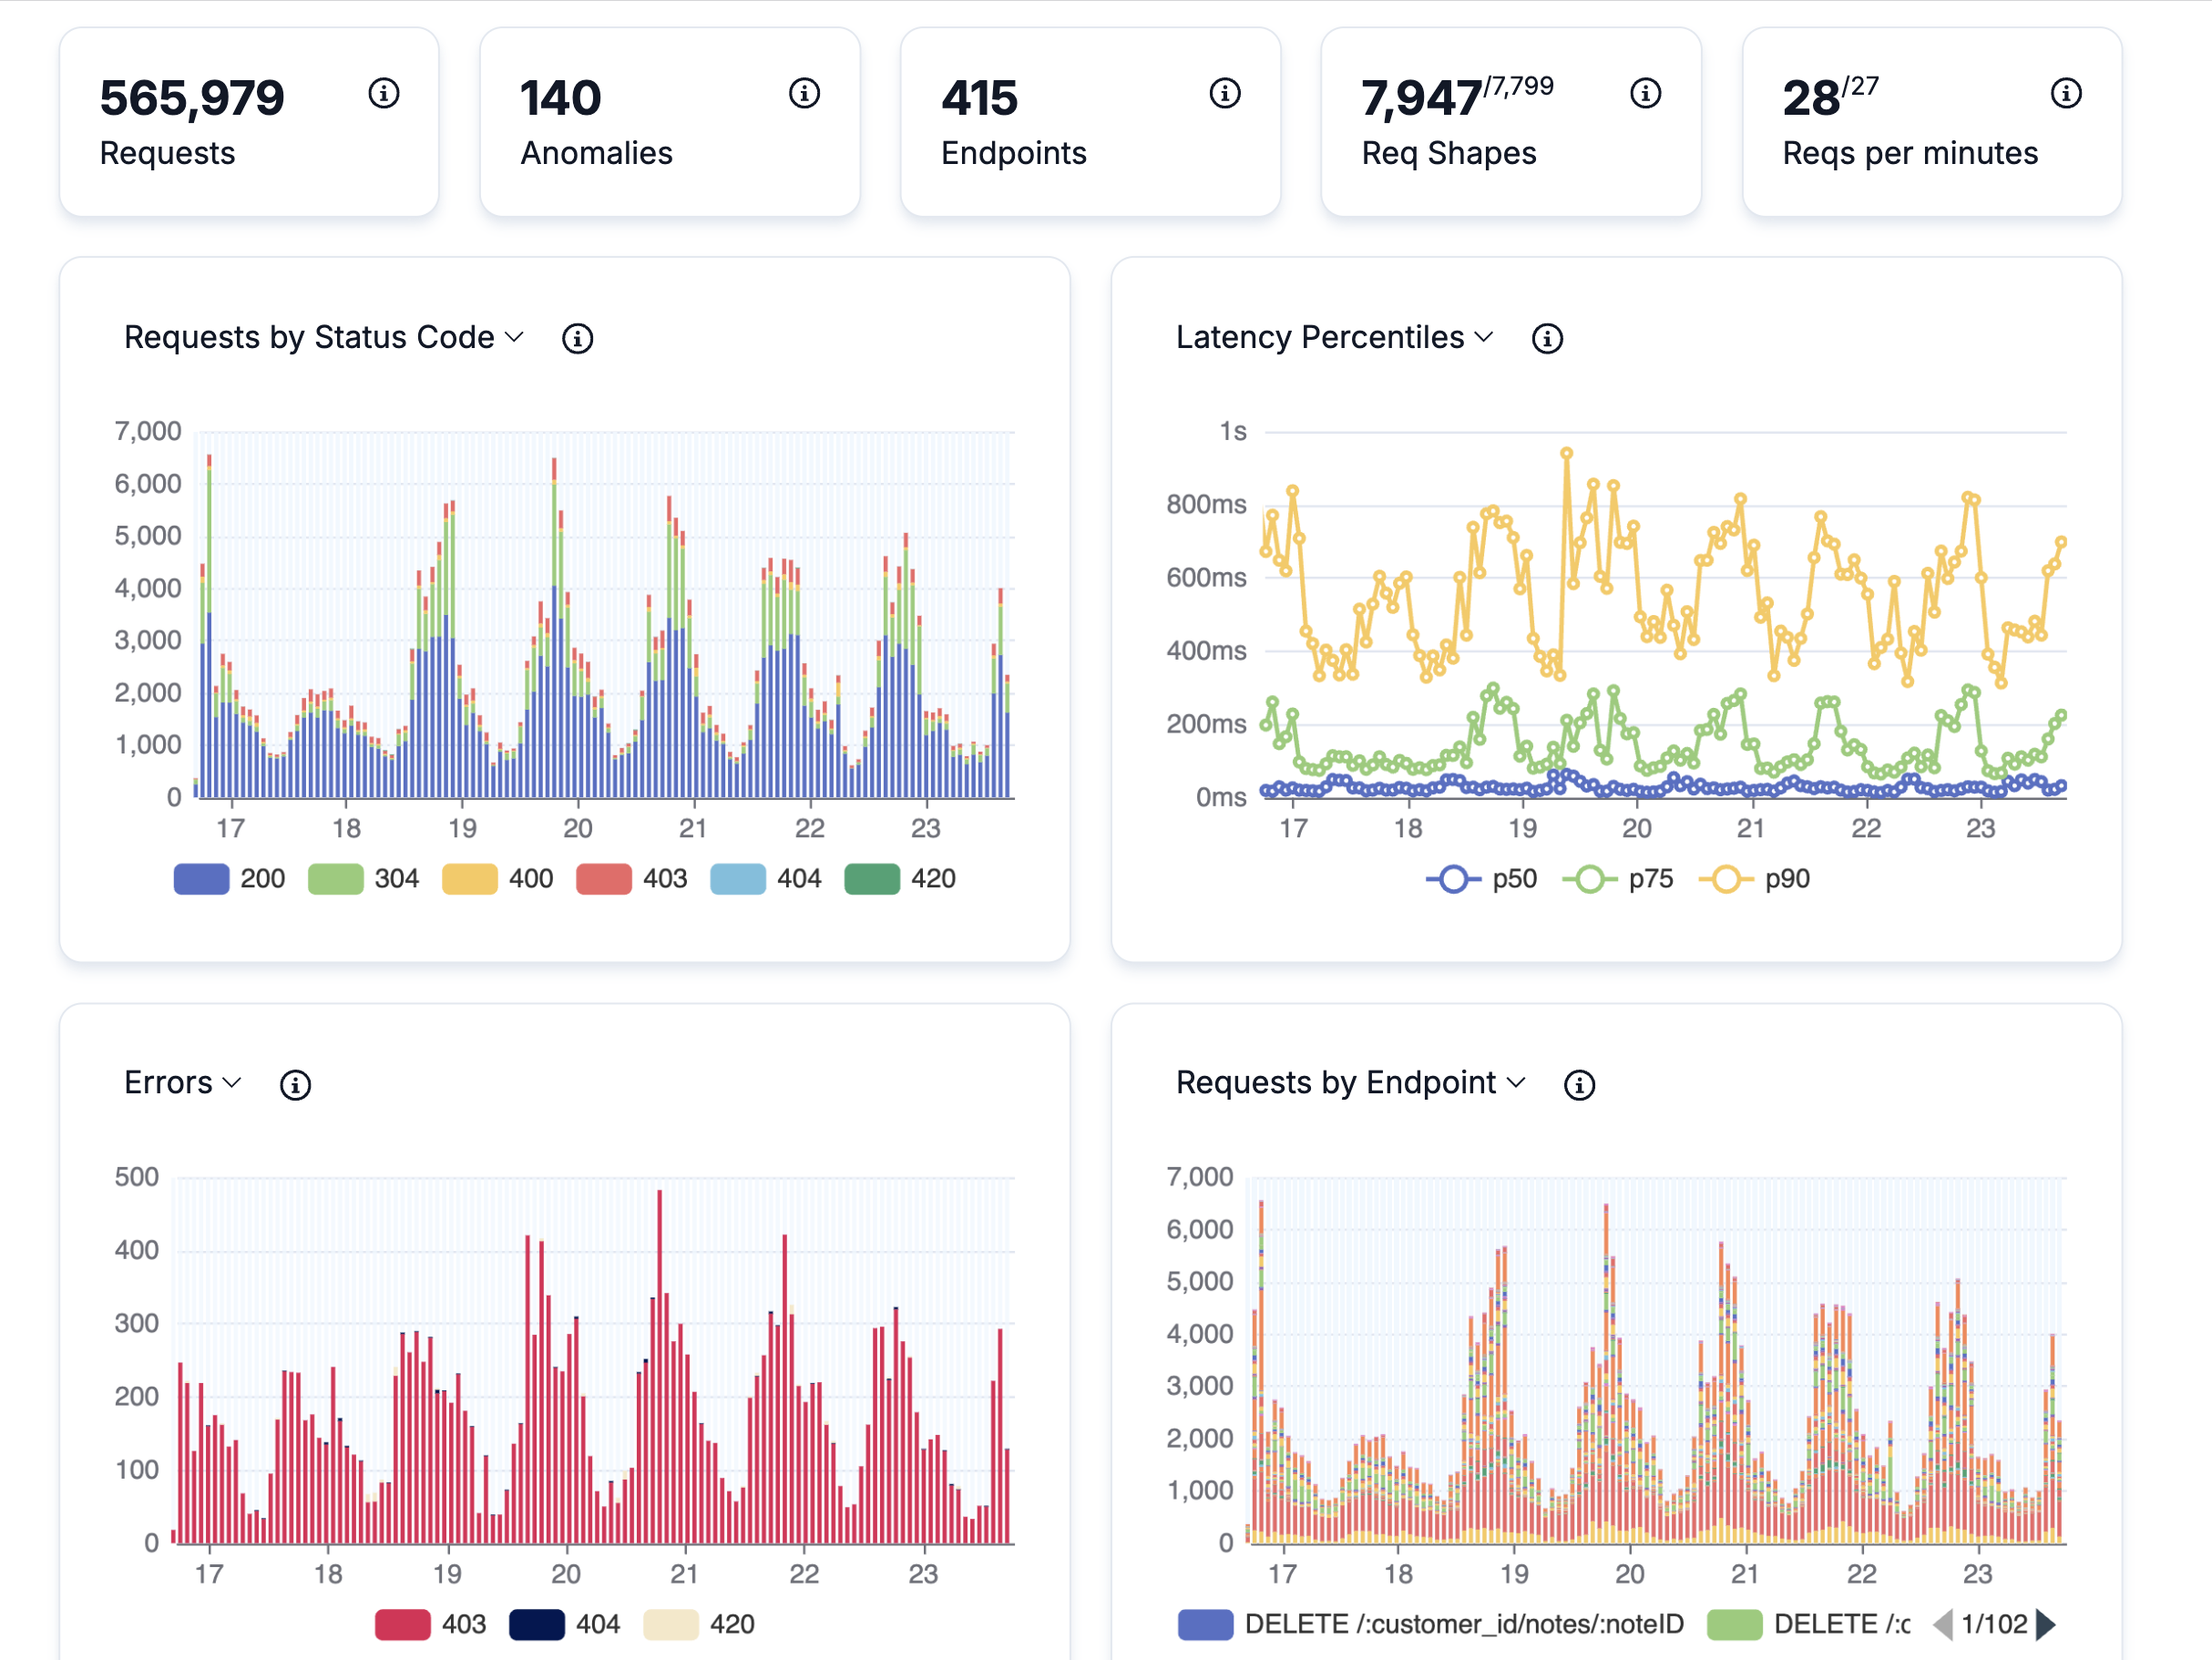
Stop API issues before they stop your customers. Achieve real-time API Observability to pinpoint issues, understand root causes, and fix problems in real-time.
Real-time Insights, Real-time Fixes
No more waiting for problems to snowball. Identify and fix issues as they happen, ensuring flawless performance and a seamless user experience.
Start for free OR Get a Demo :::: :::
Trace Every Request with Outgoing Request Monitoring
Effortlessly capture the entire request-response chain, allowing you to reproduce complex issues with ease and get to the bottom of them fast.
Start for free
OR
Get a Demo
::::
 :::
:::

Error Tracking and Logging for your APIs
Catch errors from any source, whether it’s the API itself, a dependent service, or an underlying infrastructure component. Track them back to the specific request that triggered the issue.
Start for free OR Get a Demo :::: :::
Stay on Top of Your APIs
API Monitoring
Watch errors, performance, and any numbers that matter over time.
Errors Tracking
Track errors, stack traces, and also record the incoming and outgoing requests which triggered the error. Get all information you need to reproduce a bug.
Automatic Documentation
An OpenAPI schema and spec is automatically generated from your live traffic. Approve and acknowlege endpoints and fields.
Powerful Queries
Write powerful queries against your realtime data using our visual query builder or our query language for more complex queries.
Custom Monitors and Alerts
Set up custom monitors and receive alerts when things go wrong via Slack or email.
Powerful Reports
Get daily or weekly reports about errors and performance of your entire application.
Integrate APItoolkit
ExpressJS
Here’s how to quickly integrate APItoolkit into your Express.js application.
Installation
npm install apitoolkit-express
Integrate
import express from "express";
import { APIToolkit } from "apitoolkit-express";
const app = express();
const apitoolkitClient = APIToolkit.NewClient({ apiKey: "{YOUR_API_KEY_HERE}" });

app.use(apitoolkitClient.expressMiddleware)
// All controllers should live here
app.get("/", (req, res) => {
});
// ...
// The error handler must be before any other error middleware
// and after all controllers
app.use(apitoolkitClient.errorHandler)
⏭️: Read the ExpressJS SDK guide to learn more.
Elixir Phoenix
Here’s how to quickly integrate APItoolkit into your Elixir application.
Installation
{:apitoolkit_phoenix, "~> 0.1.1"}
Integrate
// route.ex file
defmodule HelloWeb.Router do
import ApitoolkitPhoenix

pipeline :api do
plug ApitoolkitPhoenix,
config: %{
api_key: "{YOUR_API_KEY_HERE}",
}
end

// Automatic error handling
@impl Plug.ErrorHandler
def handle_errors(conn, err) do
conn = report_error(conn, err)
json(conn, %{message: "Something went wrong"})
end
end
⏭️: Read the Phoenix SDK guide to learn more.
PHP Laravel
Here’s how to quickly integrate APItoolkit into your Laravel application.
Installation
composer require apitoolkit/apitoolkit-laravel
Integrate
First, set the APITOOLKIT_KEY environment variable to your .env file.
APITOOLKIT_KEY=xxxxxx-xxxxx-xxxxxx-xxxxxx-xxxxxx
Next, register the middleware in your app/Http/Kernel.php file.
<?php

namespace App\Http;

use Illuminate\Foundation\Http\Kernel as HttpKernel;

class Kernel extends HttpKernel
{
  protected $middlewareGroups = [
    'api' => [
    \APIToolkit\Http\Middleware\APIToolkit::class,
    ],
  ];
}
⏭️: Read the Laravel SDK guide to learn more.
.NET Core
Here’s how to quickly integrate APItoolkit into your .NET application.
Installation
dotnet add package ApiToolkit.Net
Integrate
var config = new Config
{
    Debug = true, # Set debug flags to false in production
    ApiKey = "{YOUR_API_KEY_HERE}"
};
var client = await APIToolkit.NewClientAsync(config);
# Register the middleware to use the initialized client
app.Use(async (context, next) =>
{
    var apiToolkit = new APIToolkit(next, client);
    await apiToolkit.InvokeAsync(context);
});
⏭️: Read the .Net Core SDK guide to learn more.
Django
Here’s how to quickly integrate APItoolkit into your Django application.
Installation
pip install apitoolkit-django
Integrate
MIDDLEWARE = [
    ...,
    'apitoolkit_django.APIToolkit',
    ...,
]
var config = new Config
{
    Debug = true, # Set debug flags to false in production
    ApiKey = "{YOUR_API_KEY_HERE}"
};
⏭️: Read the Django SDK guide to learn more.
Golang Native
Here’s how to quickly integrate APItoolkit into your native Golang application.
Installation
go get -u github.com/apitoolkit/apitoolkit-go
Integrate
package main

import (
"net/http"
"context"
apitoolkit "github.com/apitoolkit/apitoolkit-go"
)

func main() {
// Initialize APIToolkit client with your generated API key
ctx := context.Background()
apitoolkitClient, err := apitoolkit.NewClient(ctx, apitoolkit.Config{APIKey: "{YOUR_API_KEY_HERE}"})
if err != nil {
panic(err)
}

http.Handle("/", apitoolkitClient.Middleware(http.HandlerFunc(func(w http.ResponseWriter, r *http.Request) {
w.Write([]byte("Hello, World!"))
})))
http.ListenAndServe(":8080", nil)
}
⏭️: Read the Go Native SDK guide to learn more.
FastAPI
Here’s how to quickly integrate APItoolkit into your FastAPI application.
Installation
pip install apitoolkit-fastapi
Integrate
from fastapi import FastAPI
from apitoolkit_fastapi import APIToolkit

app = FastAPI()

apitoolkit = APIToolkit(api_key="{YOUR_API_KEY_HERE}")

app.middleware('http')(apitoolkit.middleware)
⏭️: Read the FastAPI SDK guide to learn more.
PHP Symfony
Here’s how to quickly integrate APItoolkit into your Symfony PHP application.
Installation
composer require apitoolkit/apitoolkit-symfony
Integrate
First, set the APITOOLKIT_KEY environment variable in your .env file.
APITOOLKIT_KEY=xxxxxx-xxxxx-xxxxxx-xxxxxx-xxxxxx
Next, register the service in your services.yaml file.
services:
APIToolkit\EventSubscriber\APIToolkitService:
arguments:
$apiKey: '%env(APITOOLKIT_KEY)%'
# Optional: if you want to cache login result add this cache poll instance via setter injection
calls:
- setCachePool: ['@PutYourCachePoolServiceHere']
tags:
- { name: 'kernel.event_subscriber' }
⏭️: Read the Symfony SDK guide to learn more.
Flask
Here’s how to quickly integrate APItoolkit into your Flask application.
Installation
pip install apitoolkit-flask
Integrate
from flask import Flask
from apitoolkit_flask import APIToolkit

app = Flask(__name__)

apitoolkit = APIToolkit(api_key="{YOUR_API_KEY_HERE}", debug=True)

@app.before_request
def before_request():
  apitoolkit.beforeRequest()

@app.after_request
def after_request(response):
  apitoolkit.afterRequest(response)
  return response
⏭️: Read the Flask SDK guide to learn more.
Golang Gin
Here’s how to quickly integrate APItoolkit into your Gin application.
Installation
go get github.com/apitoolkit/apitoolkit-go
Integrate
package main

import (
"context"
apitoolkit "github.com/apitoolkit/apitoolkit-go"
"github.com/gin-gonic/gin"
)

func main() {

    // Initialize the client using your apitoolkit.io generated apikey
    apitoolkitClient, err := apitoolkit.NewClient(context.Background(), apitoolkit.Config{APIKey: "{YOUR_API_KEY_HERE}"})
    if err != nil {
    	panic(err)
    }

    router := gin.New()

    // Register with the corresponding middleware of your choice. For Gin router, we use the GinMiddleware method.
    router.Use(apitoolkitClient.GinMiddleware)

}
⏭️: Read the Go Gin SDK guide to learn more.
AdonisJS
Here’s how to quickly integrate APItoolkit into your AdonisJS application.
Installation
npm install apitoolkit-adonis
Integrate
First, configure the package.
node ace configure apitoolkit-adonis
Next, set API key in a /conf/apitoolkit.ts file.
export const apitoolkitConfig = {
apiKey: "",
};
Then, add @ioc:APIToolkit to your global middlewares in the start/kernel.ts file.
Server.middleware.register([
  () => import("@ioc:Adonis/Core/BodyParser"),
  () => import("@ioc:APIToolkit"),
]);
⏭️: Read the AdonisJS SDK guide to learn more.
Fastify
Here’s how to quickly integrate APItoolkit into your Fastify.js application.
Installation
npm install apitoolkit-fastify
Integrate
import APIToolkit from "apitoolkit-fastify";
import Fastify from "fastify";

const fastify = Fastify();

// Create and initialize an instance of the APIToolkit
const apittoolkitClient = APIToolkit.NewClient({
  apiKey: "{YOUR_API_KEY_HERE}",
  fastify,
});
apitoolkitClient.init();
⏭️: Read the Fastify SDK guide to learn more.
NestJS
Here’s how to quickly integrate APItoolkit into your Nest.js application.
Installation
npm install apitoolkit-express
Integrate
import { NestFactory } from "@nestjs/core";
import { APIToolkit } from "apitoolkit-express";
import { AppModule } from "./app.module";
//
async function bootstrap() {
  const apiToolkitClient = APIToolkit.NewClient({
    apikey: "{YOUR_API_KEY_HERE}",
  });
  const app = await NestFactory.create(AppModule);
  app.use(apiToolkitClient.expressMiddleware);
  await app.listen(3000);
}
//
bootstrap();
⏭️: Read the NestJS SDK guide to learn more.
Golang Gorilla Mux
Here’s how to quickly integrate APItoolkit into your Golang Gorilla Mux application.
Installation
go get -u github.com/gorilla/mux
Integrate
package main

import (
  "context"
  "net/http"
  "github.com/gorilla/mux"
  apitoolkit "github.com/apitoolkit/apitoolkit-go"
)

func main() {
  ctx := context.Background()
  // Initialize the client using your generated apikey
  apitoolkitClient, err := apitoolkit.NewClient(ctx, apitoolkit.Config{APIKey: "{YOUR_API_KEY_HERE}"})
  if err != nil {
    panic(err)
  }

  r := mux.NewRouter()
  // Register middleware
  r.Use(apitoolkitClient.GorillaMuxMiddleware)
}
⏭️: Read the Go Gorilla Mux SDK guide to learn more.
Pyramid
Here’s how to quickly integrate APItoolkit into your Pyramid application.
Installation
pip install apitoolkit-pyramid
Integrate
from wsgiref.simple_server import make_server
from pyramid.config import Configurator
from pyramid.response import Response
from pyramid.view import view_config

@view_config(
route_name='home'
)
def home(request):
return Response('Welcome!')

if __name__ == '__main__':
setting = {"APITOOLKIT_KEY": "{YOUR_API_KEY_HERE}"}
with Configurator(settings=setting) as config:
# Add APItoolkit tween
config.add_tween("apitoolkit_pyramid.APIToolkit")
config.add_route('home', '/')
config.scan()
app = config.make_wsgi_app()
server = make_server('0.0.0.0', 6543, app)
server.serve_forever()
⏭️: Read the Pyramid SDK guide to learn more.